JemRF WiFi Wireless Gateway and WiFi Sensor MQTT Options
The JemRF WiFi Wireless Gateway and WiFi Sensor have a built-in MQTT Client. The Gateway and WiFi Sensor can both send to the Monitoring Server for it to store and display readings on the use Dashboard. They can also connect to a MQTT Broker and publish the sensor readings. It can do both at the same time, or just send to the Server or the Broker. You can now use tools like Node-Red to build your own monitoring displays
The settings to publish the sensor readings to an MQTT broker are done on the MQTT Detail Tab as seen in Figure 1.
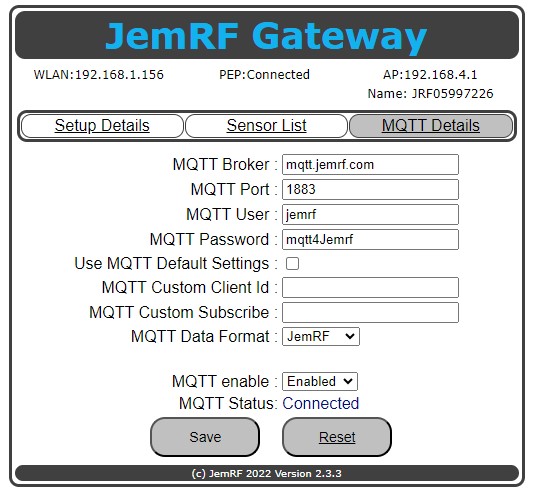 Figure 1 MQTT Details Setup.
Getting Started
Click the MQTT tab and enter the MQTT Broker, in my case my local server, the MQTT Port, for me is the standard MQTT Port. Next is the optional Username and Password.
The Gateway and WiFi Sensor come preset to Port 1883 and is configured to use the JemRF Broker. The default username is jemrf and mqtt4jemrf as the default password. If you want an private account contact sales @ jemrf.com.
Once Enabled, the unit will try and connect, if the connection is successful the screen will refresh and show Connected. If there is a problem connecting, the gateway display will stay frozen for up to one minute while the Gateway tries to connect. If the unit can not connect in the allotted time, the screen will display it has failed, the Enabled will be set to Not Enabled and a Red Failed message will appear.
Publishing Format
Using the MQTT standard protocol the Gateway will publish data to the broker using the subscription that is the combination of the Gateway Name and the sensor message. -Subscription Using the Gateway shown Figure 1, that Gateway name is JRF03516124. Using the sensor show in Figure 2
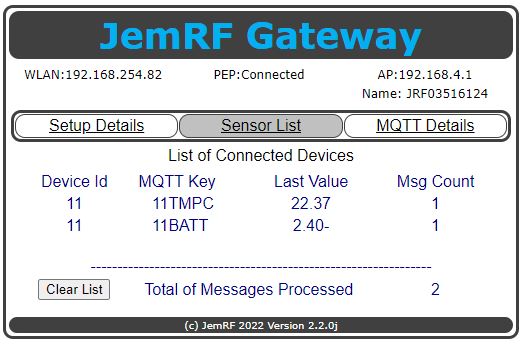 Figure 2, Sample Temperature Gateway Display
Sensor 11 is being received by the Gateway. It is a Temperature sensor (TMPC) and it has a value of 22.37 degrees C. The actual message from the sensor was in the form 11TMPC22.37. The Gateway separates the Device Id to make it easy, then the MQTT Key with the last value to see the sensors it is receiving.
For the MQTT Message, the sensor message is the MQTT Key (11TMPC) with the value 22.37.
The Gateway would publish that as: JRF03516124/[MQTT KEY] which in this example would be: JRF03516124/11TMPC with value 22.37.
When you Subscribe to the Broker to receive the messages, you would subscribe to: JRF03516124/11TMPC
If you want to see all of the sensors, you could subscribe to: JRF03516124/# and get them all.
Node-RED Dashboard
I used Node-Red to create a simple Dashboard. The configuration was:
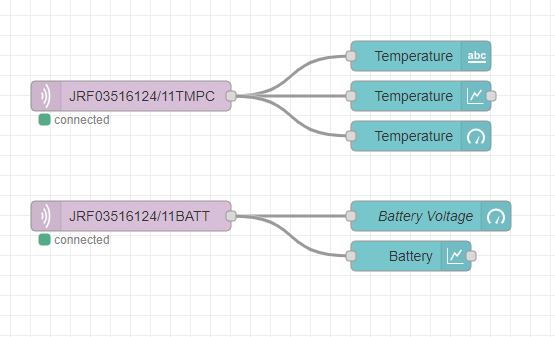 Figure 3 Node Red subscribing to Gateway and Sensor 11
With that configuration, it created the Dashboard shown below
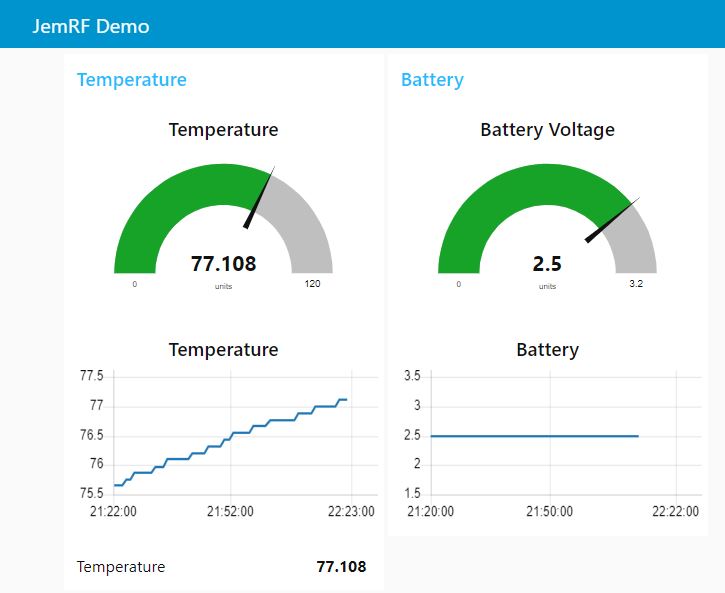 Figure 4 Sample Node-RED Dashboard
Note: Because the devices can be set to do Celsius to Fahrenheit conversion, my readings are in Fahrenheit. That the differences in values being shown vs the value received by the Gateway are in Celsius.
WiFi Sensor slightly different
The WiFI Sensor default format is the Device Id / Sensor Id / TMP / value
MQTT Formats
JemRF
This is our original format designed to support the RF sensors with the WiFi Wireless Gateway. It is now used by the WiFi Sensor as well.
The Gateway or the WiFi Sensor default topic is: [JEM {Gateway Id}] or [PEP {PEP Id}]/
Gateway With Payloads:
[sensor Id][Sensor Type] = value
On the Gateway Sensor List page, the [sensor Id][Sensor Type] is the MQTT Key.
Examples:
Sensor 21 a Digital temperature sensor with value 23.3 C would send
21TMPC023.3
The MQTT Payload would be: 21TMPC = 23.3
With battery reading MQTT Payload of: 21BATT = 2.30
For Sensor 45 a Humidity Sensor with value 98.
The MQTT Payload would be: 45HUM = 98
WiFi Payloads
[JemRF ID]
-
If Temperature Sensor Only
-
- [Sensor Id]
-
-
- TMPA = 56.07
-
- If Temperature & Humidity Sensor
-
- [Sensor Id] (Note for the dual sensor, the Sensor Id is the PEP Id)
-
-
- TMPA =66.23
-
-
-
- HUMD = 54.2
-
Cayenne
This format is designed to work with the Cayenne.MyDevices.com test site. The JSON format and the JemRF format are the same for both the Gateway and Sensor. The Cayenne data is a slightly different format is different from the WiFi Sensor.
The Gateway default publish topic is: [Gateway Id]/
With Payloads for:
Temperature:
[sensor Id] = temp,c=27.10
Humidity:
3[SensorId] = rel_hum,p=54.4
Pressure:
5[SensorId] = PA,pa=95
Battery:
2[SensorId] = BAT,v=2.75
The MQTT format for the WiFi Sensor with default topic:: [Sensor Id]/
Temperature:
500 = temp,c=27.10
Humidity:
510 = rel_hum,p=54.4
JSON
This format is a generic format and compatible with Home Assistant servers.
The default topic is: [Sensor Id]/
With Payload for temperature Only (Gateway or Sensor) with readings set to Fahrenheit.
[probe id] = [{“temperature”:”78.4”},{“unit_of_measurement”:”F”}]
.. For WiFi Sensors with multiple probes, the above format is repeated for each probe.
The Gateway messages with other sensors
[probe id] = [{“humidity”:”78.4”},{“unit_of_measurement”:”%”}]
[probe id] = [{“light”:”78.4”},{“unit_of_measurement”:”Lux”}]
Sensor With Payload for Temperature & Humidity sensor:
[probe id] = [[{“temperature”:”80.42”,”unit_of_measurement”:”F”}],[{“humidity”:”53.10”,”unit_of_measurement”:”%”}]]