Home Assistant is an open source home automation platform. It has a vast amount of interfaces (over 740 when this article was written).
JemRF Pro Series Devices
JemRF supports both a manual custom setup option for our older devices and with the WiFi Pro series we support the automated MQTT Auto Discovery features of Home Assistant 6 and up. The automated option is a selection on the MQTT Setting page “HA Discovery”.
MQTT Home Assistant Auto Discovery
This option formats the messages for Home Assistant. To assist auto discovery to work, the data payloads are JemRF type messages. Using the example of JemRF device JEMCC7DC0A28DCC with a temperature and humidity sensor, plus a flow meter sensor on the host board with a device ID CC7DC0A28DCC. There are three sub-categories under the device ID, one for Humidity, one for Temperature and one for a Flow meter.
homeassistant
homeassistant/sensor
homeassistant/sensor/CC7DC0A28DCC
homeassistant/sensor/CC7DC0A28DCC/humidity
homeassistant/sensor/CC7DC0A28DCC/humidity/config
{"device":{"identifiers":["JEMCC7DC0A28DCC"],"name":"JemRF Sensor JEMCC7DC0A28DCC","model":"WiFi Sensor","mf":"JemRF"},"device_class":"humidity","state_topic":"JEMCC7DC0A28DCC/CC7DC0A28DCC/HUM","name":"Humidity","unique_id":"CC7DC0A28DCCHumidity","state_class":"measurement","unit_of_measurement":"%","availability_topic":"JEMCC7DC0A28DCC/CheckIn","payload_available":"online","payload_not_available":"offline"}
homeassistant/sensor/CC7DC0A28DCC/temperature/config
{"device":{"identifiers":["JEMCC7DC0A28DCC"],"name":"JemRF Sensor JEMCC7DC0A28DCC","model":"WiFi Sensor","mf":"JemRF"},"device_class":"temperature","state_topic":"JEMCC7DC0A28DCC/CC7DC0A28DCC/TMPA","name":"Temperature","unique_id":"CC7DC0A28DCCTemperature","state_class":"measurement","unit_of_measurement":"°F","availability_topic":"JEMCC7DC0A28DCC/CheckIn","payload_available":"online","payload_not_available":"offline"}
homeassistant/sensor/CC7DC0A28DCC/flow/config
{"device":{"identifiers":["JEMCC7DC0A28DCC"],"name":"JemRF Sensor JEMCC7DC0A28DCC","model":"WiFi Sensor","mf":"JemRF"},"device_class":"volume_flow_rate","state_topic":"JEMCC7DC0A28DCC/CC7DC0A28DCC/FLOW","name":"Flow","unique_id":"CC7DC0A28DCCFlow","state_class":"measurement","unit_of_measurement":"gal/min","value_template":"","suggested_display_precision":2,"availability_topic":"JEMCC7DC0A28DCC/CheckIn","payload_available":"online","payload_not_available":"offline"}
with payload data in the form:
JEMCC7DC0A28DCC/CC7DC0A28DCC
HUM = 62.02
TMPA = 76.15
FLOW = 0.00
This will let MQTT Auto Discover the Sensors and present them as a single device with multiple sensors without any YAML code.
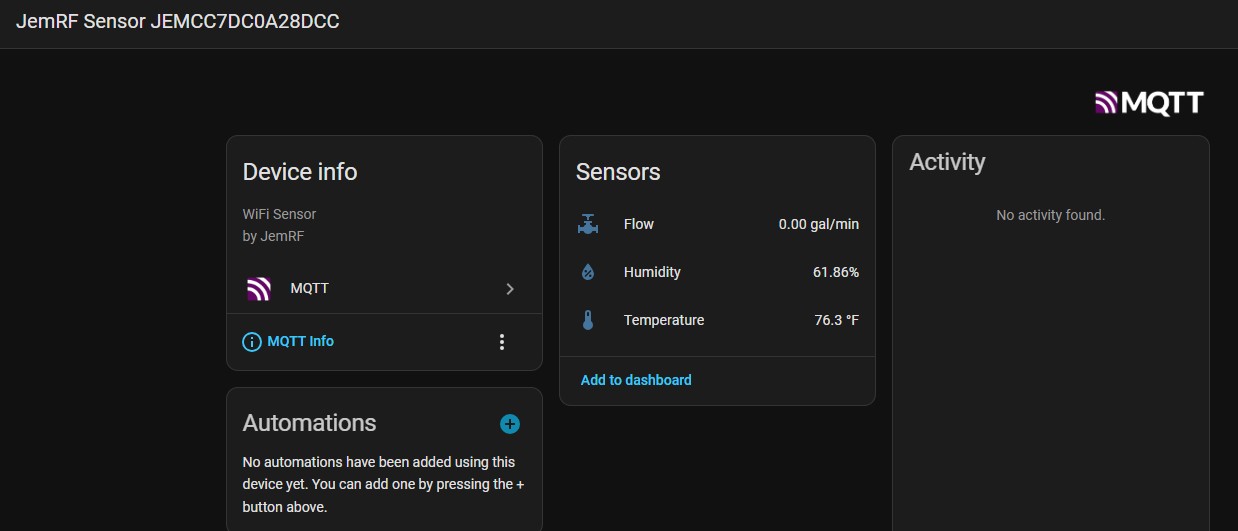 **Figure 2, MQTT Device listing
JemRF Legacy Devices
They have a well documented Getting Started Guide for Raspberry Pi so we will not cover installing Home Assistant on your Raspberry Pi in this tutorial. Here is the link for common Home Assistant tasks on Raspberry Pi.
What you will need
- Any model Raspberry Pi with preferably the full Raspbian distro
- IoT Gateway for Raspberry Pi or Flex RF Module
- Any wireless sensor
What you need to know beforehand
- How to operate a Raspberry Pi
- You have already set up your IoT Gateway and tested your sensor
- Some Python programming knowledge is preferable but not mandatory as we provide you with the source code
STEP 1: DOWNLOAD THE JEMRF MQTT LIBRARY
git clone https://github.com/JemRF/MQTT

cd MQTT
STEP 2: INSTALL MQTT (IF YOU HAVEN’T ALREADY)
sudo pip install paho-mqtt
STEP 3: CONFIGURE YOUR IP ADDRESS
sudo nano rf2mqtt.py
Page down and edit the ip_address in the Configurations section.
#Configurations===============
DEBUG = True
Fahrenheit = False
mqtt_server = "192.168.2.201" #Enter the IP address of your MQTT server
topic = "myhome"
device_prefix = "RF_Device"
#=============================
Pres CTRL-X to exit and save.
STEP 4: EDIT THE HOME ASSISTANT YAML FILE AND CONFIGURE MQTT AND YOUR SENSORS
Type:
sudo nano /home/homeassistant/.homeassistant/configuration.yaml
Then add the following section to the bottom of the file:
mqtt:
broker: 192.168.2.201

# Example configuration.yaml entry temperature & humidity sensor with a DeviceID of 04:

sensor:
  - platform: mqtt
    name: "Temperature"
    state_topic: "myhome/RF_Device04"
    unit_of_measurement: '°C'
    value_template: ""


  - platform: mqtt
    name: "Humidity"
    state_topic: "myhome/RF_Device04"
    unit_of_measurement: '%'
    value_template: ""
Remember to restart the Home Assistant service:
sudo systemctl restart home-assistant@homeassistant.service
STEP 5: RUN THE INTERFACE
python rf2mqtt.py
You should see output like this:
pi@raspberrypi:~/MQTT $ python rf2mqtt.py
Sat Aug 4 18:50:12 2018 a04STARTED--
Sat Aug 4 18:50:12 2018 a04STARTED--
Sat Aug 4 18:50:18 2018 a04TMPB25.39
Sat Aug 4 18:50:18 2018 a04TMPB25.39
Sat Aug 4 18:50:18 2018 a04TMPB25.39
Sat Aug 4 18:50:18 2018 a04HUM58.70-
Processing data : DevId=04,Type=4,Value1=25.39,Value2=58.70
{"TMP": "25.39", "HUM": "58.70"}
Sat Aug 4 18:50:18 2018 a04HUM58.70-
Sat Aug 4 18:50:18 2018 a04HUM58.70-
Sat Aug 4 18:50:18 2018 a04SLEEPING-