MQTT Details
The MQTT Details page is used to identify the optional MQTT Broker you want data sent to, the access account information and other details. The options allow for custom Client Id used by some public brokers and the optional custom subscribe field. The Smart Gateway can send data to both the monitoring server and MQTT broker or just to one, that is a user option.
The default is a blank page and not connected to any broker. The Reset Form will fill out the MQTT settings with the connection information to use the free JemRF Broker. Once the form is filled out, the Enable activated the connection. The status of the connection will show below the Enable option and at the top of each page. There can be a slight delay between the Enable and the Status update showing connected. The actual connection is not made until there is new data to send. So, depending on how many sensors you have and how often they are transmitting, the connection delay will vary.
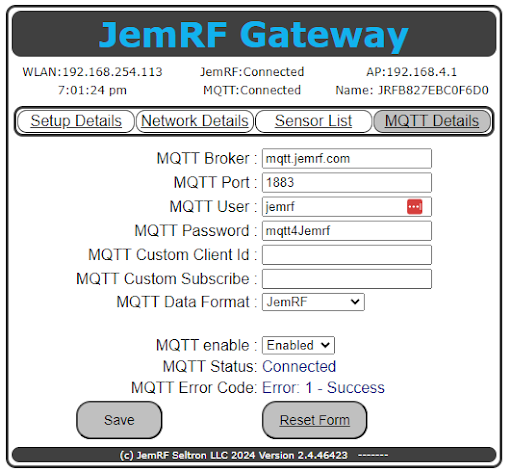
The image below shows the MQTT Details page with a successful connection to the JemRF MQTT Broker.
 Figure 1 The MQTT Details screen.
If the connection fails an Error code is displayed and some description:
Error Codes
- 1 - Success - Authenticated and connected to the broker.
- 2 - Connection refused - incorrect protocol version
- 3 - Connection refused - invalid client identifier
- 4 - Connection refused - server unavailable
- 5 - Connection refused - bad username or password
- 6 - Connection refused - not authorized
MQTT Formats
The MQTT Agent in the Smart Gateway has four data format options.
- 1 - JemRF - Send data using the device Id as part of the subscription and the raw data sent from the sensor.
- 2 - Cayenne - Message format used by Cayenne test broker
- 3 - JSON - Data is packaged in JSON packet with Device Id in the subscribe and a value and data type message.
- 4 - SparkplubBv3.0 - Data is encrypted and uses the SparkplugB version 3 format.
JemRF Format
[JemRF ID]
-
If a Temperature Sensor Only
-
- [Sensor Id]
-
-
- TMPA = 56.07
-
-
- [Sensor Id]
-
-
- HUMD = 54.2
-
Cayenne Format
This format is designed to work with the Cayenne.MyDevices.com test site. The JSON format and the JemRF format are the same for both the Gateway and Sensor.
The Gateway default publish topic is: [Gateway Id]/
With Payloads for:
Temperature:
[sensor Id] = temp,c=27.10
Humidity:
3[SensorId] = rel_hum,p=54.4
Pressure:
5[SensorId] = PA,pa=95
Battery:
2[SensorId] = BAT,v=2.75
The MQTT format for Sensor with default topic:: [Sensor Id]/
Temperature:
500 = temp,c=27.10
Humidity:
510 = rel_hum,p=54.4
JSON Format
This format is a generic format and compatible with Home Assistant servers.
The default topic is: [Sensor Id]/
Example Payloads:
- 1 For temperature with readings set to Fahrenheit.
[probe id] = [{“temperature”:”78.4”},{“unit_of_measurement”:”F”}]
- 2 For Humidity with readings in percentage
[probe id] = [{“humidity”:”78.4”},{“unit_of_measurement”:”%”}]
- 3 For readings by the light sensor, showing level in Lux
[probe id] = [{“light”:”78.4”},{“unit_of_measurement”:”Lux”}]
SparkplugBv3.0
This format follows the specifications detailed at Sparkplug.eclipse.org. Messages are encrypted during transmission from the sender to the receiving application. Data seen and processed by the broker is encrypted.
The JemRF adaptation is the in the default Custom subscribe: spBv1.0/JemRFDevices
NOTE: The Subscribe field is required and must be set to start: spBv1.0 if that is missing it will default to spBv1.0/JemRFDevices.
Sparkplug messages in JSON format are shown below. The first timestamp is message send time, and the second timestamp is the sensor sampled time.
Format Template
{ “timestamp”: 1486144502122, “metrics”: [{ “name”: “My Metric”, “alias”: 1, “timestamp”: 1479123452194, “dataType”: “String”, “value”: “Test” }], “seq”: n }
JemRF Example for temperature sensor 87
For this example for temperature sensor with the Id of 87, the topic would be /spBv1.0/JemRFDevices/DDATA/JRFB827EBC0F6D0/87
The data value example would be:
{ “timestamp”: 1486144502122, “metrics”: [{ “name”: “Temperature”, “timestamp”: 1479123452194, “dataType”: “Float”, “value”: “25.4” }], “seq”: 2 }
Custom Device Id
A special feature of the Smart Gateway allows for changing the Device Id and impersonate another Gateway.
The Device Id is the Name shown in the upper right of each web page. It is used as part of the MQTT subscribe reference for the Gateway to know which gateway sent the data. The default value is presented in the MQTT Custom DeiceId field.
Changing the MATT Custom DeviceId value, allows replacing an existing Gateway without the receiving system having to be changed.
The result is the MQTT subscribe reference remains the same for data archiving even with a different physical hardware device.\
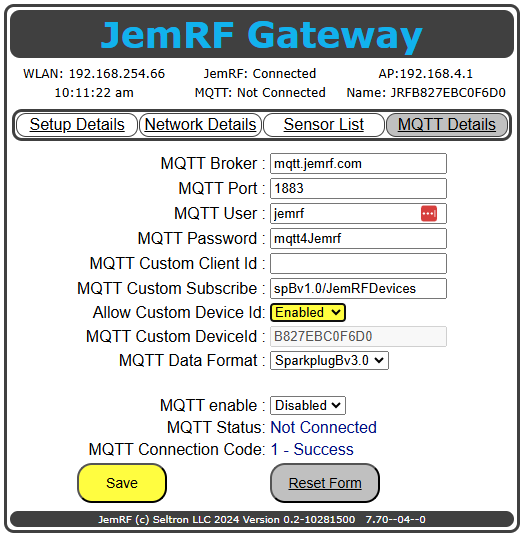
The MQTT Custom DeviceId field is disabled to prevent accidental changes. To enable the field, click the Allow Custom Device Id drop-down menu and select Enable, as shown in Figure 2.

Figure 2 Enable Custom Device Id screen.
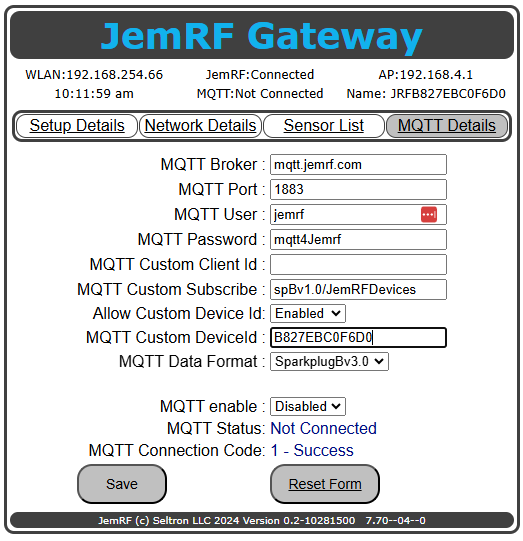
Once Enabled you can change the Device Id.

Figure 3 Screen shot ,show the MQTT Custom DeviceId is enabled to changed.