LLAP REFERENCE GUIDE
From OpenMicros.org Archives at:
LLAP - Lightweight Local Automation Protocol - Last Updated on Monday, 02 November 2015 15:32
In this document we bring together everything you need to know about LLAP.
Introduction by the inventor. 1
Where is LLAP implemented?.. 3
Ciseco defined personalities. 5
Creating your own sensor / actuator personality. 6
Programming Gateways or applications for LLAP Personalities. 6
Appendix 1: Generic LLAP messages. 6
Message request/response pairs. 6
Device related announcements. 8
Appendix 2: XRF personalities. 9
Appendix 3: Permissable LLAP Message Characters. 9
Entering LLAP commands via a terminal window.. 11
Introduction by the inventor
LLAP: an introduction LLAP s inventor, Miles Hodkinson explains why he invented LLAP and why it came out the way it did.
What is LLAP used for?
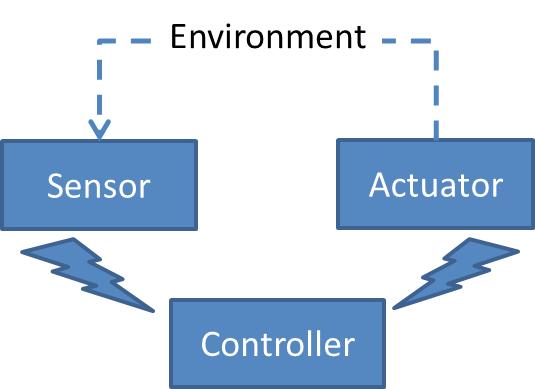
LLAP can be used to convey all sorts of short messages, but in our world, we use it to send short human readable messages between sensors, controllers and actuators in control systems.
There are two main types of device:
1. Devices that are polled for data at regular intervals or sent commands by the controller (similar to MODBUS and the main stay of operation). These devices are normally permanently powered or are continually charged e.g. via solar power or another form of energy harvesting.
2. Devices that send data when they have something to send. This further splits in two common types:
Devices that sleep most of the time and occasionally wake up and transmit readings. These are usually cyclic and repeat their behaviour. They are often battery powered; they sleep to conserve energy.
Devices that need to send an alert, e.g. a doorbell, smoke sensor, overflow detection etc. Their behaviour is to report at the moment the action or detection occurred. These can be powered by any means. Some can sleep and wake on an interrupt caused by the external event they are monitoring.
Any message that conforms to the message format rules defined in this document is considered to be a valid LLAP message. However, for a message to make sense to a recipient, it needs to carry data that the recipient can handle.
There are several sets of messages:
-
Generic messages: all LLAP devices should be able to handle these. They are listed in Appendix 1
-
Ciseco defined personalities : these are specific message sets that only certain LLAP devices can handle. There are pre-defined personalities for light and temperature sensors, relay control, button and Hall Effect sensors, as well as generic analogue to digital conversion and general purpose digital I/O tasks. Today we have these personalities in firmware for the XRF. We are looking to extend this to the SRF also. See Appendix 2 for details of the XRF personalities.
-
User defined personalities : you can define your own set of messages and use these with your controllers and devices. If you want to use Ciseco radio technology, you will probably choose the XinoRF or the Raspberry Pi as your controller and the RFμ328 as the base for your sensor or actuator. You will also be able to use our LLAP libraries to make sending and receiving LLAP messages a breeze.
Where is LLAP implemented?
LLAP messages are simple text messages and completely independent from the underlying infrastructure and transmission media used to convey the messages. That means that LLAP can be used anywhere you can exchange text.
In particular, a user can type in a LLAP message in a terminal window on a Windows, Linux or Mac based computer, or on a Raspberry Pi for instance and receive a response from devices in a Ciseco device network to which that computer is connected. Note: The only proviso when working with Ciseco radios is that you type fast enough to make sure the LLAP message is sent in one data packet. Cut and paste is usually the best approach.
Ciseco have freely available software that uses the LLAP message format for communications:
-
Firmware for the XRF that implements a number of sensors and actuators. We refer to this firmware as personalities . Since all XRFs ship with serial pass-through firmware, customers will need to load an XRF that is to be configured as a specific sensor or actuator with the appropriate firmware using XCM. See the section on personalities for details.
-
Example software for our Arduino based SRF units (XinoRF and RFμ328) to emulate XRF personalities for sensors and actuators.
-
An Arduino LLAP library makes it very easy for customers to write their own sensor or actuator software and to define their own messages as appropriate.
-
A Python LLAP library is under construction too and is the best base for development of LLAP software on the Raspberry Pi for instance.
How does LLAP work?
It is assumed that messages either arrive completely and without errors or don t arrive at all. The communication infrastructure should provide for message integrity (e.g. via CRC) and messages that get corrupted must be intentionally lost by the infrastructure. Ciseco radios have this property.
When you send a message, you should not expect any acknowledgement from the communications infrastructure as to whether it was sent or not. The only way to know if a message was received is by the recipient sending you a response LLAP message.
Message format
Each message is exactly 12 characters long and in three distinct sections:
-
One start byte
-
Two bytes for the device identifier
-
Nine data bytes, padded by dashes if necessary.
<SB> <ID> <ID> <D> <D> <D> <D> <D> <D> <D> <D> <D>
See Appendix 3 for details of the permissable characters in each field.
Address range
With two ID bytes that can each assume 30 different values, it is possible to address 900 individual devices. Excluding the special characters, the range extends to 26 X 26 = 676 devices.
Ciseco radio devices each operate with a specific PANID. Each PANID defines a subnet, within which 676 or 900 devices are addressable. The usable PANIDs run from 0000 (hex) to EFFF (hex), or 61,439 subnets.
In a single location, it is thus possible to host 41.5 million devices.
Device start-up
A new out of the box device is pre-assigned the generic ID of -- (dash dash). When it is powered up it sends
**a–STARTED **
When a controller hears this, it should reply with
a–ACK——
If no response is heard then a further 5 attempts (retries) are made, again in the same format.
a–STARTED
a–STARTED
a–STARTED
a–STARTED
a–STARTED
The device now assumes normal operation on the ID of
Address allocation
Assuming the controller did hear the device it begins by allocating it a unique address. The controller will send out
a CHDEVIDXX
where XX represents the ID to allocate to the device. The device responds to this by echoing the command
a CHDEVIDXX
The controller then requests the device to restart thus applying the new ID
a–REBOOT—
The device then resets and starts up by announcing
aXXSTARTED–
This is repeated at 193mS intervals for an additional 5 times unless the controller replies with
aXXACK——
This startup message now happens every time that the device is reset or powered up and acts to inform the controller that the device is available.
Request/response pairs
Commands from the controller, are acknowledged by the device by one of two methods. Either repeating the command (simple acknowledgment of receipt) or replying with the data requested. The response should be sent back within 0.1 second (100ms). If no receipt message is received then further requests can be sent. The number of retries is normally 5, however this can be changed within the controller or the device.
Examples:
When a controller requires a device to reboot, it sends:
aXXREBOOT—
The device sends back a similar message to acknowledge receipt.
aXXREBOOT—
It then carries out the command (to reboot in this case).
A controller may request the version number of the firmware on device with address XX by sending:
aXXAPVER—-
The device then sends back the requested information:
aXXAPVER1.01
where 1.01 is the version number.
Announcements
Some messages are simple announcements and do not require a response.
Example:
When a device starts (is powered up, or reset), it should send out an announcement to say it is available:
**aXXSTARTED **
A battery powered device will report that its battery is low:
aXXBATTLOW–
Personalities
A device with a LLAP personality is capable of generating and responding to the set of messages that are defined for that personality.
There are two types of personality:
-
Ciseco defined personalities are available as firmware that a user can load onto an XRF to make that XRF into a temperature sensor, an actuator for relays, etc.
-
User defined personalities are defined by third parties to create their own specific sensors and actuators.
Ciseco defined personalities
Ciseco provide a range of sensor and actuator personalities. Each is encapsulated in firmware that needs to be written to the radio device to give your radio unit a specific predefined function.
| Personality | Type | XRF | SRF | XinoRF / RFμ328 | Comments |
|---|---|---|---|---|---|
| Temp. thermistor | Sensor | Y | N | Beta |
Single thermistor sensor
|
| Temp. Dallas | Sensor | Y | N | N |
Single Dallas DS18B20 sensor input
|
|
Button / Hall Effect
|
Sensor | Y | N | Beta |
Two button and one Hall Effect input
|
| Analog | Sensor | Y | N | N |
Single channel analogue input
|
| Light | Sensor | Y | N | Beta |
Single LDR sensor
|
| Generic I/O |
Sensor / Actuator
|
Y | N | N |
Three digital outputs, four digital and three analogue inputs
|
| Relay | Actuator | Y | N | N |
Dual relay on/off/toggle
|
| RGB encoder | Actuator | Y | N | N | |
| Count | Sensor | Beta | N | N | |
| Tacho | Sensor | Beta | N | N | |
| Ultrasonic | Sensor | Beta | N | N |
Personalities for the XRF
The personalities for the XRF assume the LLAP device XRF pin-out described here: http://openmicros.org/index.php/articles/87-llap-lightweight-local-automation-protocol/llap-devices-commands-and-instructions/190-llap-device-xrf-pinout
The firmware for these personalities is available on github (https://github.com/CisecoPlc/XRF-Firmware-downloads).
All you need to do is select the function required, buy the appropriate sensor or actuator and combine it with an XRF, perhaps conveniently using one of our boards. Using the XRF Configuration Manager (XCM) software you then program the XRF with the chosen personality and you are done.
Instructions on how to update the firmware on an XRF are available here: http://openmicros.org/index.php/articles/84-xrf-basics/111-firmware-updating-how-to
(This doc needs to be updated with the Explorer Plus method of firmware upload).
LLAP commands for Ciseco radio personalities must be issued over the air not via the Serial
Personalities for the SRF
Personalities for the SRF are pending demand from our users. Most of the XRF personalities will also work on the SRF, but since the SRF does not have exactly the same pin-out as the XRF, some parts may not work as expected. We currently do not support ruuning LLAP personalities on SRF’s, try it ar your own risk.
Creating your own sensor / actuator personality
Any developer worth their salt wants to make sensors and actuators do something a bit different from the pre-defined Ciseco provided personalities. So we got loads of requests for customisation, which we found hard to respond to (due to the volume in demand).
Allowing anyone to create their favourite sensor personality and allowing these to be uploaded to the XRF proved too painful. Programming the CC111x chip is a professional job and the increased chances of end user software interfering with the correct operation of the radio would mean our products would soon be seen as unreliable.
We needed a solution which allows you to program the personality yourself without compromising the reliability of the radio. Our solution is to add a separate end-user programmable processor to our radio unit in serial pass-through mode. This combination is now available in two form factors:
-
RFμ-328 combines an Arduino 328 with our SRF on the same Xbee form factor that is used by the XRF
-
XinoRF places our SRF on an Arduino Uno compatible board
RFμ-328 is ideal for low power deployment scenarios, whereas XinoRF is more suitable for development. Both units are software compatible, so software developed on one can be run without change on the other.
We are developing the sketches to cover the personalities we have for the XRF. They will be placed on github as they become available.
The Arduino LLAP library (http://openmicros.org/index.php/articles/85-llap-lightweight-local-automation-protocol/266-arduino-llap-library-for-user-devices) is the base against which we develop these. We recommend users who wish to code their own Arduino based sensors, actuators and controllers, to use this library also.
Programming Gateways or applications for LLAP Personalities
At some point many users want to develop some application or gateway to talk to our XRF Personalities.
Before writing any code we recommend that you try out you LLAP commands first using your favorite serial terminal program. This way you see what messages you need to send an what messages you might receive in reply.
Appendix 1: Generic LLAP messages
LLAP devices should be able to handle messages from the set of generic messages defined in this section.
Message request/response pairs
APVER Request the LLAP version
aXXAPVER—- Requests the supported LLAP version number response from the device is aXXAPVER9.99 where 9.99 is the version number. The current version at present is 1.0
BATT - Request battery level in Volts
aXXBATT—– will reply aXXBATT3.43- (3.43V)
CHDEVID Change device ID
aXXCHDEVIDDD Request that the device change its device ID to DD. The change will only take place when the device is rebooted.
CYCLE Start cyclic mode (only applies to cyclic sleeping devices)
aXXCYCLE— Request that the device starts a cyclic sleep the device should sleep for the sleep interval, awaken and send any reading. The device wiull then go back to sleep. Every (default 10) times it will send aXXAWAKE—- aXXBATTv.vv- wait for 100mS incase there is a command for the unit and then send aXXSLEEPING-. This is configurable by using aXXWAKECnnn- whenre nnn is the count of transmits before it will wake and send the battery reading.
DEVNAME Request the manufacturer device name
aXXDEVNAME– Request the device name. Response is a nine character friendly name.
DEVTYPE Request the device type
aXXDEVTYPE– Request the device type. Response is a nine character device type e.g. aXXU00000001 Device types beginning with U are reserved for users to assign to their own prototype devices. All other device types will be kept on a register by CISECO Plc., that can be used to update hubs on a regular basis. In APVER 1.1 this will change to a eight character field e.g. aXXU0000001-
FVER Request the manufacturer firmware version
aXXFVER—– Request the device firmware version. Response is aXXFVER9.99- e.g. aXXFVER0.32-
HELLO Request the device to acknowledge it s there.
aXXHELLO—- Request the device to confirm it is receiving, response is aXXHELLO—-
INTVL Sets the sleep interval between activities” (only applies to cyclic sleeping devices)
XXINTVL999P Set the cyclic sleep interval to 999 periods Periods can be S(seconds), M(minutes), H(hours), D(days)
PANID Change PANID
aXXPANIDFFFF Requests that the device change its PANID to FFFF(the id of the channel the device listens to). PANID is a four character hexadecimal number on XRF or XBee wireless networks. All devices within the same PANID can communicate with each other. The change will only take place when the device is rebooted via a REBOOT command..
REBOOT Force a restart
aXXREBOOT— Request that the device reset itself.
RETRIES Set the amount of messages to retry to get an ACK from the hub
aXXRETRIESRR Set the amount of retries that uninitiated sends should try before giving up, default is 5 (number can be 00-99) this is set by RR
SER Request the manufacturer serial number
aXXSER—— Request the device serial number, response is a 6 character serial number, e.g. aXXSER000001
SLEEP Requests the device go into low power mode (only applies to sleeping devices)
aXXSLEEP999P Request that the device sleep for 999 periods , the response echos the command, the device will then send the notification aXXSLEEPING- when going to sleep, and the announcement aXXAWAKE—- when the device reawakens. Periods can be S(seconds), M(minutes), H(hours), D(days) T(milliseconds)
aXXSLEEP—- (only applies to interrupt sleeping devices) . Sleep until an interrupt is received. Only the Button firmware behaves like this at present. Every (default 10) times it will send aXXAWAKE—- aXXBATTv.vv- wait for 100mS incase there is a command for the unit and then send aXXSLEEPING-. This is configurable by using aXXWAKECnnn- whenre nnn is the count of transmits before it will wake and send the battery reading.
Device related announcements
AWAKE Device has re awoken (only applies to devices that support sleep)
aXXAWAKE—- Device is now awake, <Possible addition: if the device is a cyclic sleep device then the device should now remain awake for at least 100mS listening for hub requests. Such a device does not need to announce that it is awake at each cycle, but is expected to do so at least every 5 minutes.
BATTLOW - Device battery is low (only applies to battery powered devices)
aXXBATTLOW–
ERROR
aXXERRORnnnn - This is to notify that something unexpected happened at the device and that should be investigated. The nnnn can be used by the manufacturer to denote what type of error occurred.
SLEEPING- Device is going to sleep (only applies to devices that support sleep)
aXXSLEEPING-
STARTED
aXXSTARTED– This is to notify the hub that a device has just started. The hub can then add the device back into the list of active devices.
Appendix 2: XRF personalities
The following XRF personalities are available:
XRF Firmware - Button & Hall Effect
XRF Firmware - Temperature: Dallas
XRF Firmware - Temperature: Thermistor
Appendix 3: Permissable LLAP Message Characters
These are the characters available for use in each byte.
| Start | ID | ID | Data1 | Data2 | Data3 | Data4 | Data5 | Data6 | Data7 | Data8 | Data9 |
| a | A | A | [space] | [space] | [space] | [space] | [space] | [space] | [space] | [space] | [space] |
| B | B | ! | ! | ! | ! | ! | ! | ! | ! | ! | |
| C | C | " | " | " | " | " | " | " | " | " | |
| D | D | # | # | # | # | # | # | # | # | # | |
| E | E | $ | $ | $ | $ | $ | $ | $ | $ | $ | |
| F | F | % | % | % | % | % | % | % | % | % | |
| G | G | & | & | & | & | & | & | & | & | & | |
| H | H | ' | ' | ' | ' | ' | ' | ' | ' | ' | |
| I | I | ( | ( | ( | ( | ( | ( | ( | ( | ( | |
| J | J | ) | ) | ) | ) | ) | ) | ) | ) | ) | |
| K | K | * | * | * | * | * | * | * | * | * | |
| L | L | + | + | + | + | + | + | + | + | + | |
| M | M | , | , | , | , | , | , | , | , | , | |
| N | N | - | - | - | - | - | - | - | - | - | |
| O | O | . | . | . | . | . | . | . | . | . | |
| P | P | / | / | / | / | / | / | / | / | / | |
| Q | Q | 0 | 0 | 0 | 0 | 0 | 0 | 0 | 0 | 0 | |
| R | R | 1 | 1 | 1 | 1 | 1 | 1 | 1 | 1 | 1 | |
| S | S | 2 | 2 | 2 | 2 | 2 | 2 | 2 | 2 | 2 | |
| T | T | 3 | 3 | 3 | 3 | 3 | 3 | 3 | 3 | 3 | |
| U | U | 4 | 4 | 4 | 4 | 4 | 4 | 4 | 4 | 4 | |
| V | V | 5 | 5 | 5 | 5 | 5 | 5 | 5 | 5 | 5 | |
| W | W | 6 | 6 | 6 | 6 | 6 | 6 | 6 | 6 | 6 | |
| X | X | 7 | 7 | 7 | 7 | 7 | 7 | 7 | 7 | 7 | |
| Y | Y | 8 | 8 | 8 | 8 | 8 | 8 | 8 | 8 | 8 | |
| Z | Z | 9 | 9 | 9 | 9 | 9 | 9 | 9 | 9 | 9 | |
| - | - | : | : | : | : | : | : | : | : | : | |
| # | # | ; | ; | ; | ; | ; | ; | ; | ; | ; | |
| @ | @ | < | < | < | < | < | < | < | < | < | |
| ? | ? | = | = | = | = | = | = | = | = | = | |
| \ | \ | > | > | > | > | > | > | > | > | > | |
| * | * | ? | ? | ? | ? | ? | ? | ? | ? | ? | |
| 0 | 0 | @ | @ | @ | @ | @ | @ | @ | @ | @ | |
| 1 | 1 | A | A | A | A | A | A | A | A | A | |
| 2 | 2 | B | B | B | B | B | B | B | B | B | |
| 3 | 3 | C | C | C | C | C | C | C | C | C | |
| 4 | 4 | D | D | D | D | D | D | D | D | D | |
| 5 | 5 | E | E | E | E | E | E | E | E | E | |
| 6 | 6 | F | F | F | F | F | F | F | F | F | |
| 7 | 7 | G | G | G | G | G | G | G | G | G | |
| 8 | 8 | H | H | H | H | H | H | H | H | H | |
| 9 | 9 | I | I | I | I | I | I | I | I | I | |
| J | J | J | J | J | J | J | J | J | |||
| K | K | K | K | K | K | K | K | K | |||
| L | L | L | L | L | L | L | L | L | |||
| M | M | M | M | M | M | M | M | M | |||
| N | N | N | N | N | N | N | N | N | |||
| O | O | O | O | O | O | O | O | O | |||
| P | P | P | P | P | P | P | P | P | |||
| Q | Q | Q | Q | Q | Q | Q | Q | Q | |||
| R | R | R | R | R | R | R | R | R | |||
| S | S | S | S | S | S | S | S | S | |||
| T | T | T | T | T | T | T | T | T | |||
| U | U | U | U | U | U | U | U | U | V | V | V | V | V | V | V | V | V | </tr>
| W | W | W | W | W | W | W | W | W | |||
| X | X | X | X | X | X | X | X | X | |||
| Y | Y | Y | Y | Y | Y | Y | Y | Y | |||
| Z | Z | Z | Z | Z | Z | Z | Z | Z | |||
| [ | [ | [ | [ | [ | [ | [ | [ | [ | |||
| \ | \ | \ | \ | \ | \ | \ | \ | \ | |||
| ] | ] | ] | ] | ] | ] | ] | ] | ] | |||
| ^ | ^ | ^ | ^ | ^ | ^ | ^ | ^ | ^ | |||
| _ | _ | _ | _ | _ | _ | _ | _ | _ |
Entering LLAP commands via a terminal window
LLAP commands must be sent in one radio packet. The best way to achieve this is to enter a command into a text editor and then copy/paste into the terminal window. Typing is too slow as the radio will send the packet as soon as the ATRO timeout has occured - this is usually set to 16mS.. Using XCM the commands can can be entered into the text bar and then the send button can be pressed.